Learn how to minimize the formation of bubbles when mixing a two part epoxy system and how to most effectively remove bubbles if they are already present in your mixed material.
 DOWNLOAD NOW
Download our printable guide on the different methods of how to remove bubbles from a two part epoxy system
How To Minimize Bubbles in a Two Part Epoxy
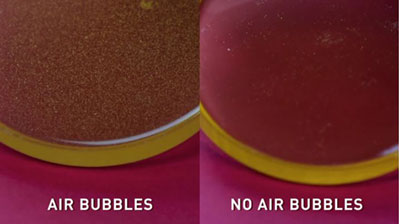
As a preliminary step, proper mixing is the best way to avoid the formation of air bubbles in an epoxy system. Proper mixing ensures that not too much air entrapment takes place.
 Mix by hand using a stirring tool
Mixing should be done slowly and thoroughly to prevent injecting air into the compound. It is important to remove air bubbles before using an epoxy system. Air bubbles may cause voids or air gaps in the epoxy which can lead to poor adhesive performance.
 Utilize a Centrifuge
The most effective way to remove air bubbles from an already mixed, unfilled two part system is by using a centrifuge. (Refer to the user manual for specific instructions on how to use your centrifuge). High quality deaeration can be accomplished with a centrifuge at 1,000 to 3,000 RPM for a few minutes. If you still see air bubbles - repeat the centrifuge cycle and adjust the RPM if needed.
 Utilize Vacuum Degassing
Vacuum degassing is another effective way to remove air bubbles. This can be done by placing the mixed epoxy in a vacuum chamber - the size of the container should be 5 to 10 times the volume of the epoxy. A vacuum of 29 inches of Hg needs to be pulled.
 Use Heat to Lower The Viscosity
Other options to remove air bubbles include lowering the viscosity of the system by adding heat between 35°C to 40°C in a shallow mixing vessel for a short period of time.
Please note that this might not be ideal if the working life of the product is not long - pre-heating a quick curing epoxy is not recommended.
Remember, air bubble removal is an important way to ensure the most suitable end result when working with a two part epoxy system.
Disclaimer: Please ensure that the appropriate precautions are exercised in terms of safety, health and feasibility of the techniques included here. Please note that this guide should not to be used for any specification purposes.